Summary :
Some Windows users report getting a “Not a PNG file” error when trying to open an image with Photoshop. If you are experiencing the same error, do not panic. In this post, MiniTool Partition Wizard brings some solutions to this and you can try it.
Quick navigation :
Solution 1: Update Your Photoshop to the Latest Version Solution 2: Change the File Extension of the Image Solution 3: Re-Save the Image as PNG Format Solution 4: Change the Photoshop Settings User Comments
Adobe Photoshop, Adobe Inc. It is a raster graphics editor developed and published by Microsoft for Windows and macOS. It has a history of nearly 30 years and has become the industry standard for raster graphics editing. It supports all image formats from JPG to PNG format.
Unfortunately, some Windows users report that they cannot work with images because they receive the error message “Not PNG file”. If you are also bothered by this issue, you may need the following solutions.
Solution 1: Update Your Photoshop To The Latest Version
Developers keep releasing new updates for better compatibility, new features and bug fixes. If your Photoshop is out of date, you can visit the official website to download the latest version. Then check if the “Photoshop is not a PNG file” error disappears. If it still exists, try the next solution.
Would you like to try Photoshop on your computer? If yes, please take a few minutes to learn Photoshop system requirements.
Solution 2: Change the File Extension of the Image
Not a PNG file Photoshop error can occur if the file extension of the image you want to open with Photoshop is incorrect. In other words, if the PNG format image is a JPG file, you may not be able to load the image into Photoshop’s workspace.
To check this, you can open the image with Notepad.
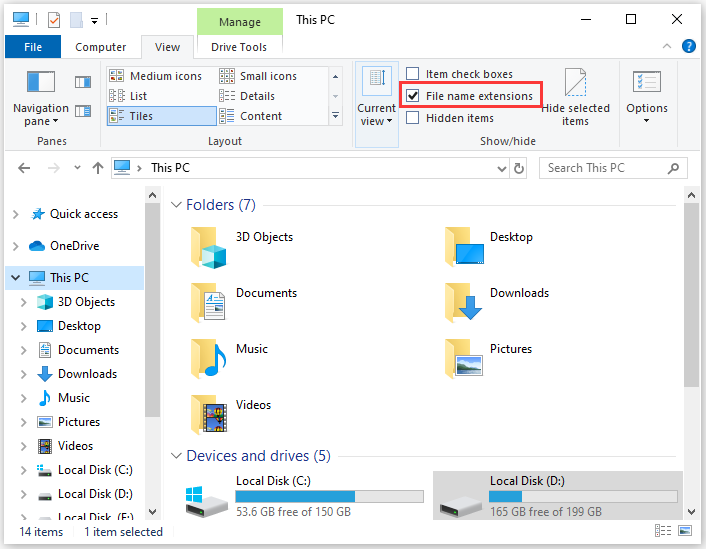
If the file starts as ÿØÿá in Notepad, it indicates that it is actually a JPG image. To fix things, you need to change the PNG format to JPG format. Just press Win + E to open File Explorer. Under the View tab, make sure the “File name extensions” option is checked. Then change the file extension of the image from PNG to JPG by renaming it.
Hint: If it shows ‰PNG, it’s a PNG image.
Then you can check if the Photoshop error without PNG file is fixed.
If you are not familiar with Notepad, you can try the next solution.
Solution 3: Re-Save Image as PNG Format
You can also try re-saving the target image as PNG format to fix Photoshop not a PNG file error. Here are the detailed steps.
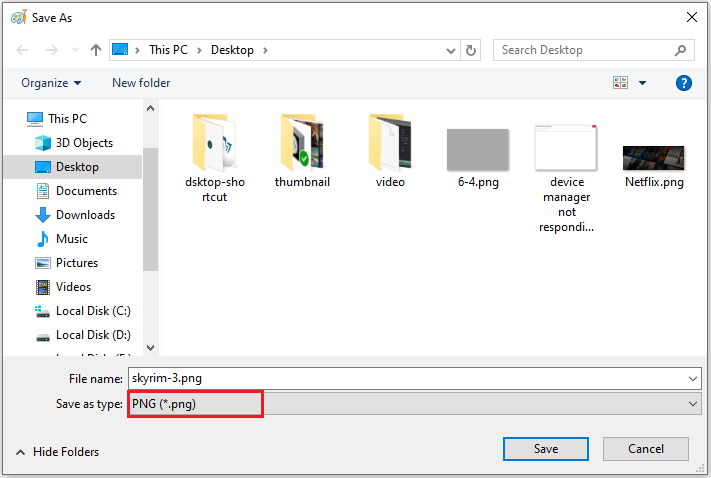
Step 1: Right-click the image and choose Open With > Paint.
Step 2: In Paint, choose File > Save As.
Step 3: In the pop-up window, select PNG (*.png) from the drop-down menu for the “Save as type” option.
After that, you can try to open the new image in Photoshop and check if it works properly.
Solution 4: Change Photoshop Settings
Besides the image format, the Photoshop not a PNG file issue may also have something to do with some Photoshop settings. And you can try the following actions to make improvements.
Disable Temporarily Use Graphics Processor Feature
Step 1: Go to Edit > Preferences in Photoshop.
Step 2: Select Preferences in the left pane of the popup window.
Step 3: In the right pane, uncheck the Use Graphics Processor feature.
Step 4: Click OK.
Then you can restart Photoshop and check if the mentioned error is gone. After that, don’t forget to enable this feature again in case you need to use it to deal with some tasks.
Reset Photoshop Preferences
You may also need to reset Photoshop Preferences. Just go to Edit > Preferences in Photoshop. On the General tab, click the Reset Preferences button on Exit and then restart your computer.
Sometimes Adobe Photoshop may keep freezing for strange reasons. In this article, you will learn 7 methods to fix Photoshop freezing issue on Windows.